It's debatable when and where the Deep Fried Turkey originated but THANK GOD for whomever and from wherever and whenever it came. The crisp-seasoned skin and moist-oil- bathed meat has been gaining popularity for some time now.
A few years ago, I took on the challenge of eliminating the night-long vigil required for baking your turkey and replacing it with a quick, hot-oil, deep bath. Risking a visit from the local fire house, I braved into the world of deep frying. Years later, I am happy to report my catering company has a reputation for our deep fried turkeys and not one visit from Station House #9.
Eager to share my method with the world, I am doing a step-by-step tutorial.
STEP #1
Selecting a great turkey is key to me. I would stay away from store brands and go with the top tier. I like Butterball the best.
 STEP#2
A good brine goes a long way in plumping up your turkey for maximum moisture. Personally, I use a blend of ice water, vegetable stock, cloves, salt, 5 Blend Peppercorns and brown sugar. The typical time for a brine is 12-24 hours but even 8 hours helps. You can also find pre-made brines at some cookware and bakeware stores.
STEP #3
After the brine, it is time to deep fry this puppy. The best oil to use for deep frying is peanut oil. Your goal temperature is 350 degrees; anything higher and the oil starts to burn. If you are doing this indoors, use a deep frying pot and be sure to only fill the oil to the "max" fill line. You can always add oil if the bird isn't fully covered when you submerge it. But taking oil out at 350 degrees when you have filled it too high is the number one cause of "deep frying" related fires.


STEP #4
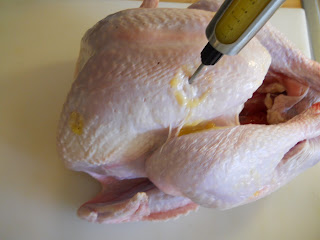
The key ingredient to any deep fried turkey is "the injection". Because of the popularity of deep fried turkeys, a Baskin Robbins explosion of flavors are available these days. Everything from Cajun to Sweet Butter Pecan. You can make your own injection flavor or leave it up to the "pros".
There are four (4) areas that are key to injection for a flavorful bird. They are: Breast, Wing, Drumstick and underneath.


STEP #5
Now that your bird is prepped, it is time to give this turkey a hot oil bath. Insert the turkey on the hook and raise above the pot. Using rubber gloves SLOWLY submerge the turkey into the oil. The slower you can do this, the better. Dropping the turkey in quickly causes boil over and could lead to a fire.
The general rule of thumb is to cook your turkey for 3-5 minutes per pound.
When you think the turkey is done pull the turkey out and take its internal temperature. It should reach 165 degrees. The turkey should have a nice golden brown appearance.
STEP #6
The final step is applying a finishing glaze to a hot turkey. Doing this shortly after taking the turkey out will add a nice succulence to the skin and meat.

STEP #7
It is time to reap the benefits of your efforts. Carve this golden carcass of perfection and plate it up.

BON APETITE!
Ahahahaha! Golden Carcass of Perfection?! I love it!
ReplyDeleteThanks :)
ReplyDelete